

Analog Starter keeps the shared application under src and stores site-specific content, configuration, and assets under sites. The repository includes sites/demo, which is used by default and provides examples of every supported content type.
This guide covers the shortest path from the repository to a deployed site. It also explains how to run the project locally when you are ready to replace the demo content.
Deploy with Vercel
The quickest way to see the starter online is to deploy the demo site with Vercel.
Start from the repository
Open the repository README and click the Deploy button.
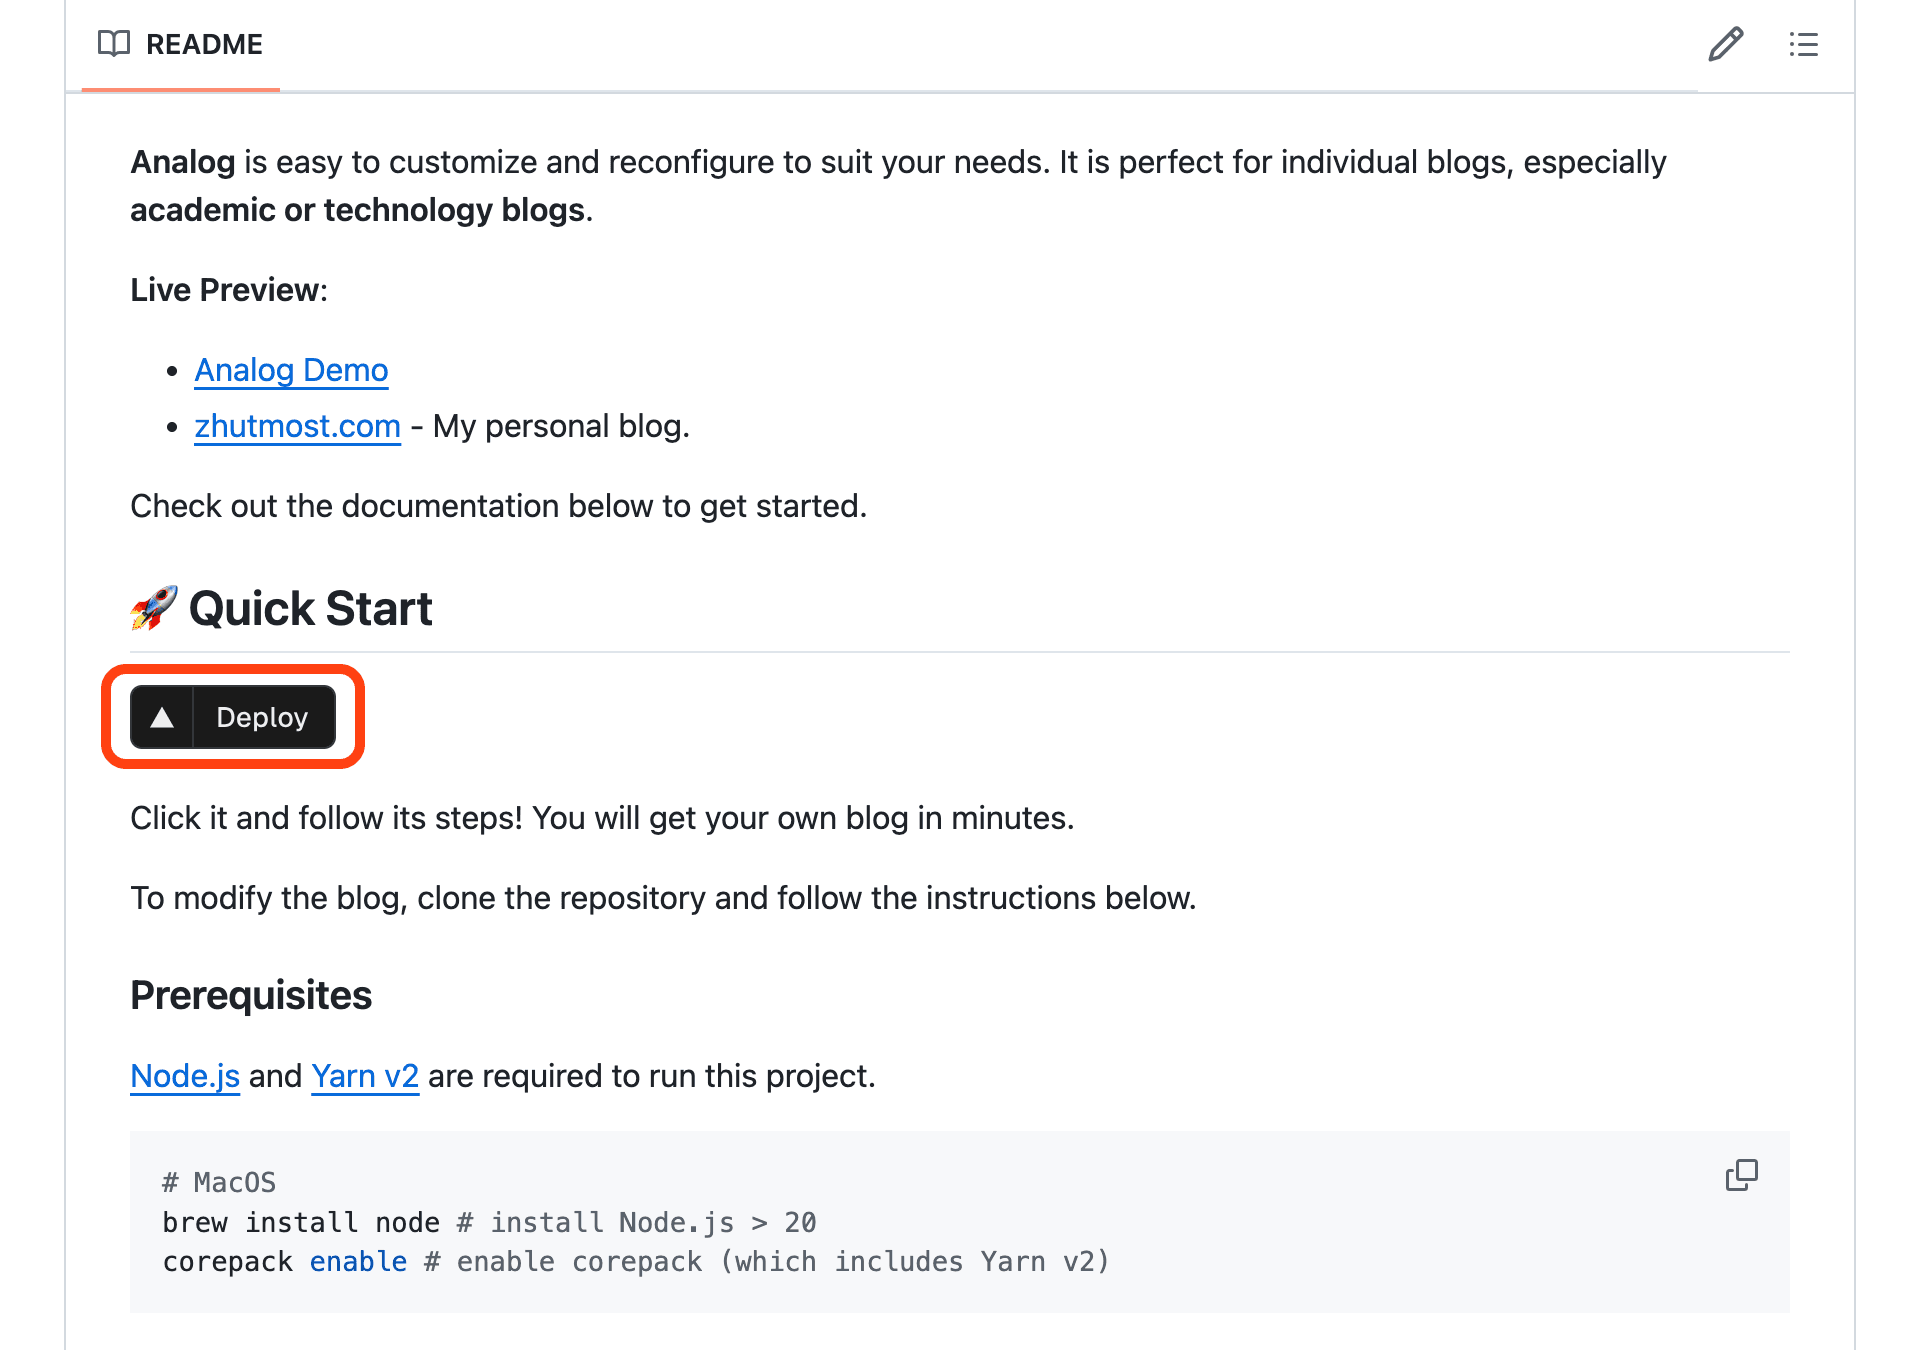
Vercel may ask you to sign in and connect a GitHub account before continuing.
Create the project repository
Choose the GitHub account that should own the new repository and enter a repository name.
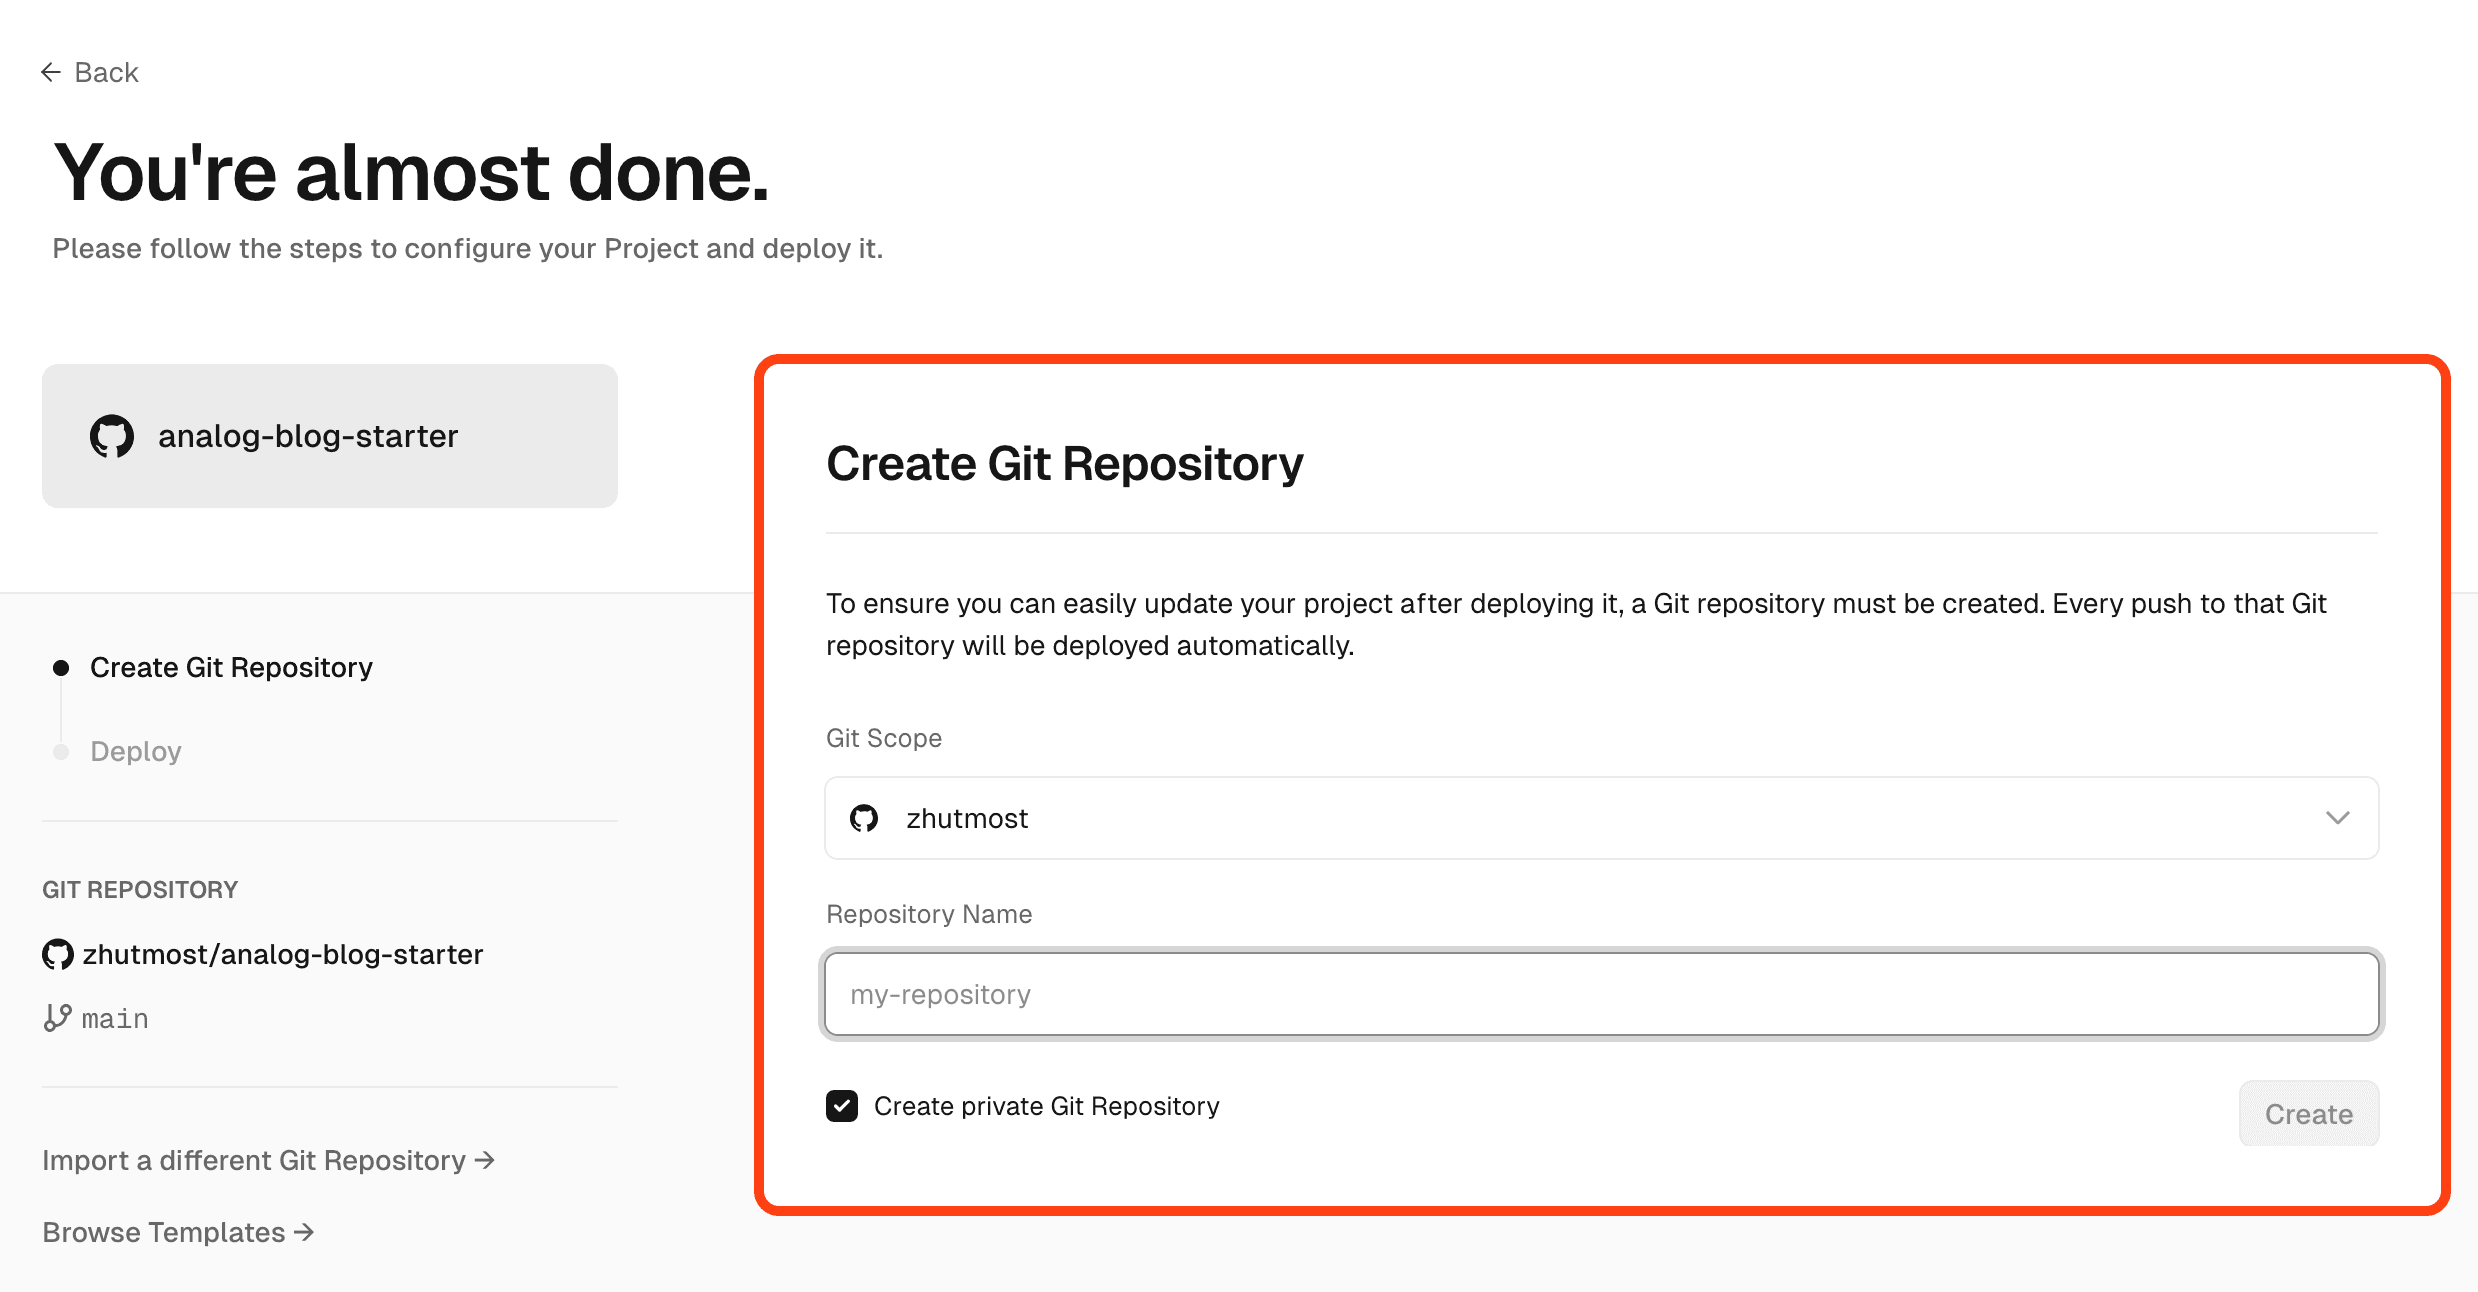
Continue with the detected Next.js framework settings. The first deployment uses sites/demo, so no environment variable is required yet.
Open the deployment
Vercel builds the project and assigns it a temporary vercel.app domain. When the deployment is ready, use Visit to open the site.
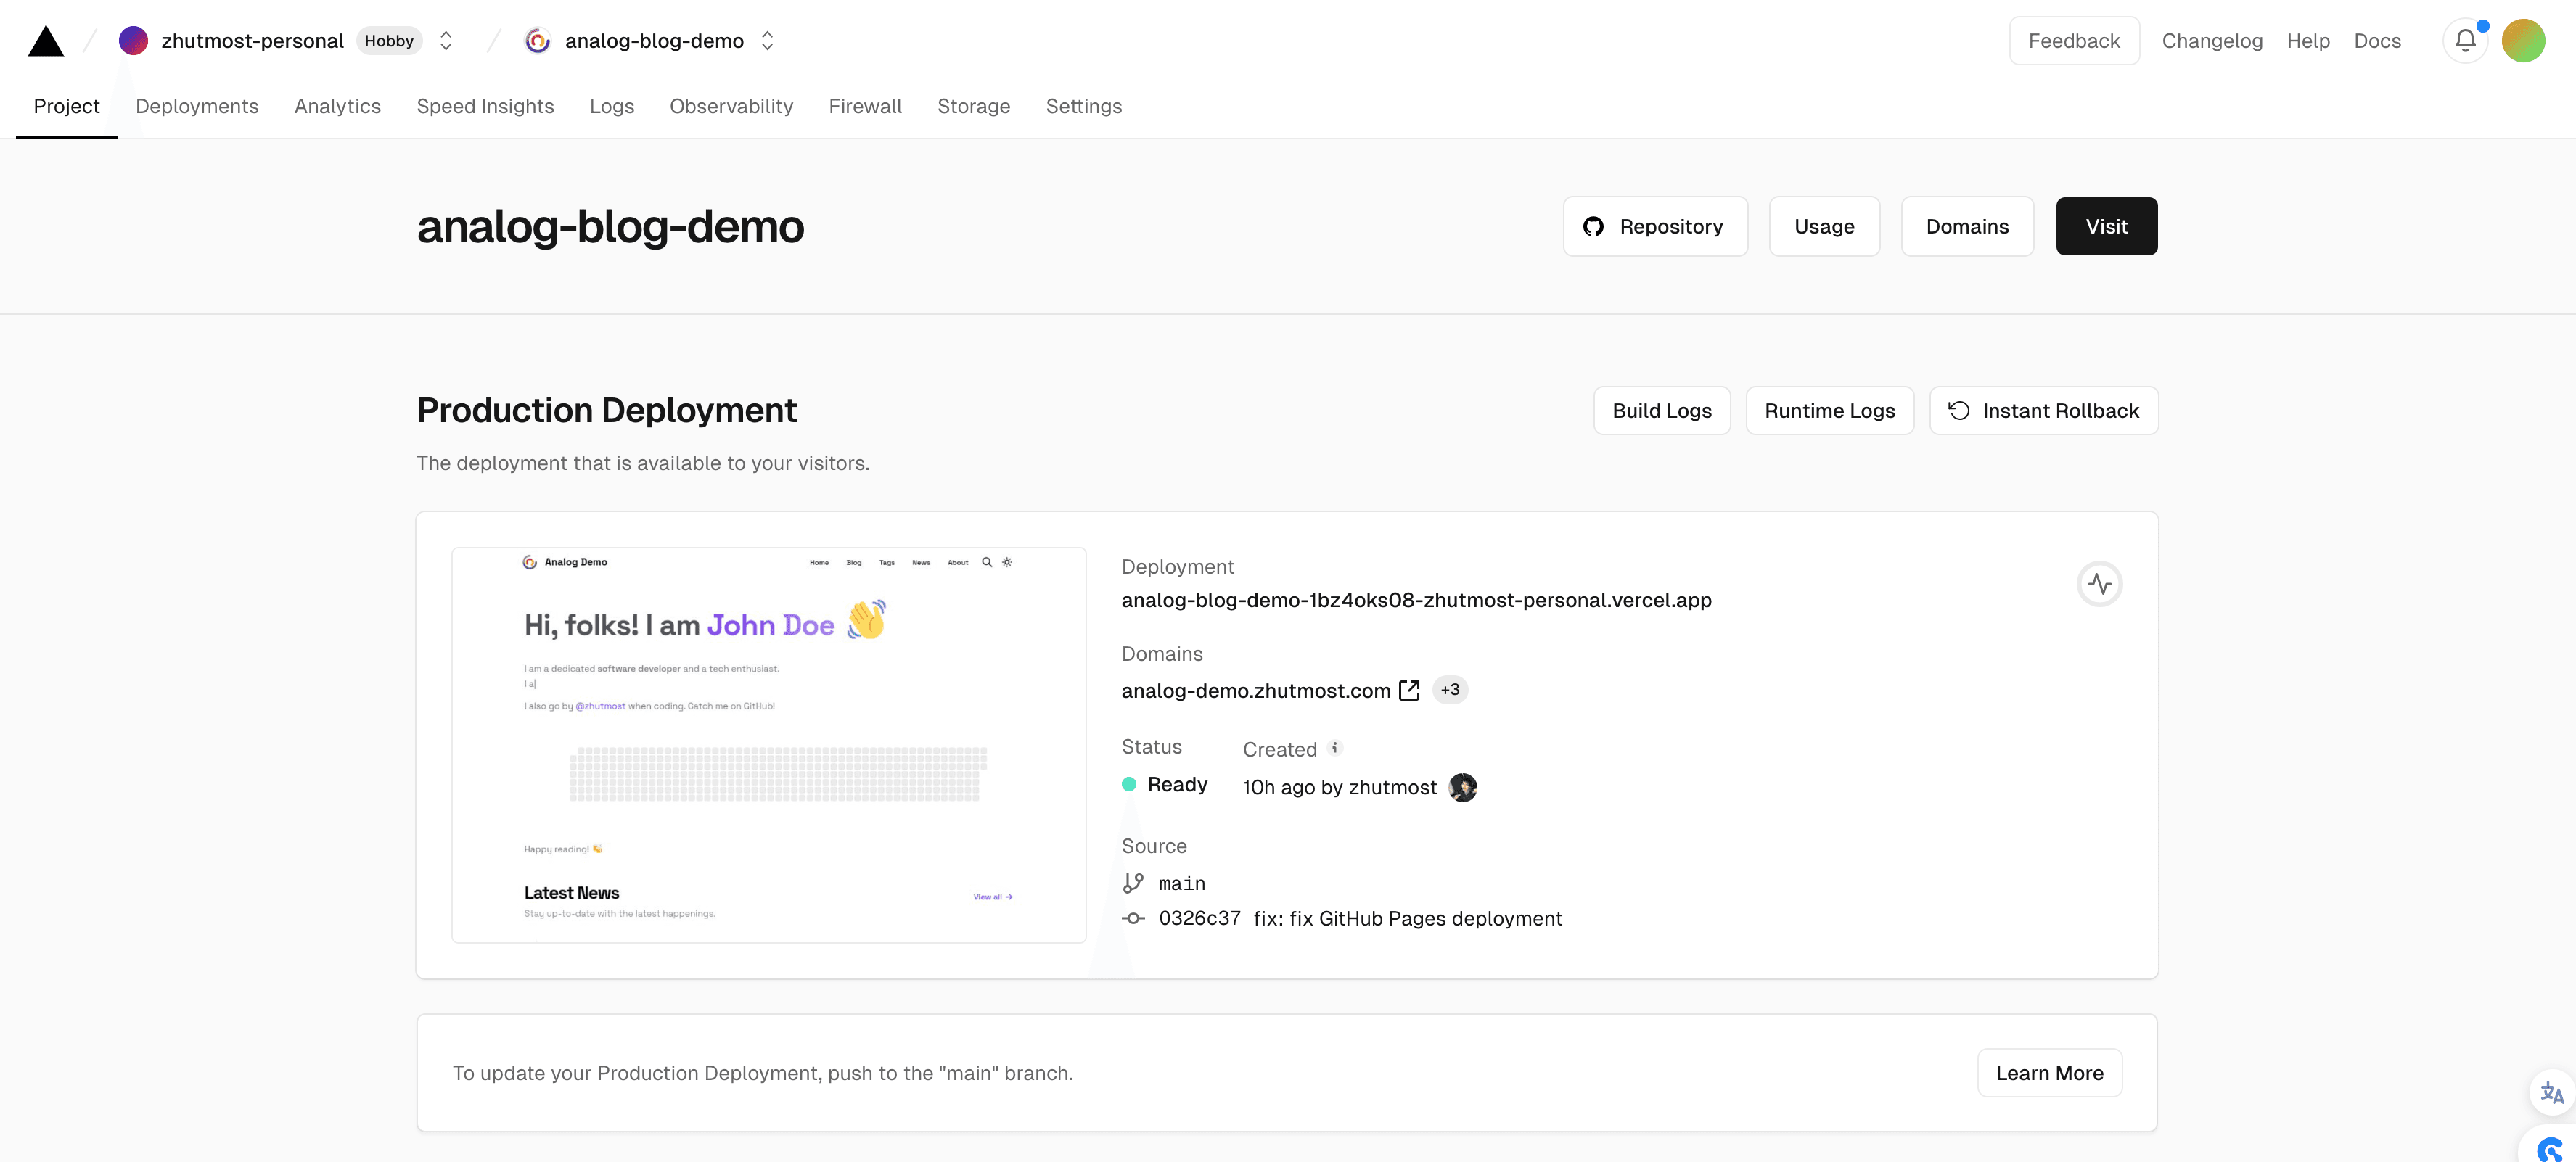
Future pushes to the connected GitHub repository trigger new deployments automatically.
Run the project locally
Local development is useful when replacing several files, previewing MDX, or checking a change before pushing it to GitHub.
You will need:
On macOS, Bun can be installed with Homebrew:
brew install oven-sh/bun/bunInstructions for other platforms are available in the Bun installation guide.
Clone the repository created during deployment:
git clone https://github.com/your-name/your-repository.git
cd your-repository
Install the dependencies and start the development server:
bun install
bun run dev
Open http://localhost:3000. Changes to most MDX, YAML, and site data files are reflected automatically while the server is running.
Create your site directory
You can edit sites/demo directly, but copying it keeps the documentation and placeholder content available as a reference:
cp -R sites/demo sites/my-siteCreate a .env.local file at the repository root:
SITE_DIR=sites/my-siteRestart the development server after changing SITE_DIR.
The copied directory contains:
sites/my-site/
├── _authors/
├── _pages/
├── _posts/
├── public/
├── src/
├── home-intro.mdx
├── people.yml
├── site.config.ts
└── next.config.ts
Start by replacing the site configuration, homepage introduction, example profiles, and posts. The demo news page and data modules, home-intro.mdx, and people.yml are optional and may be removed when they are not needed. Remove their navigation or homepage references from site.config.ts as well.
Select the same directory on Vercel
When the deployed site is stored outside sites/demo, open the Vercel project and go to Settings → Environment Variables. Add:
SITE_DIR=sites/my-site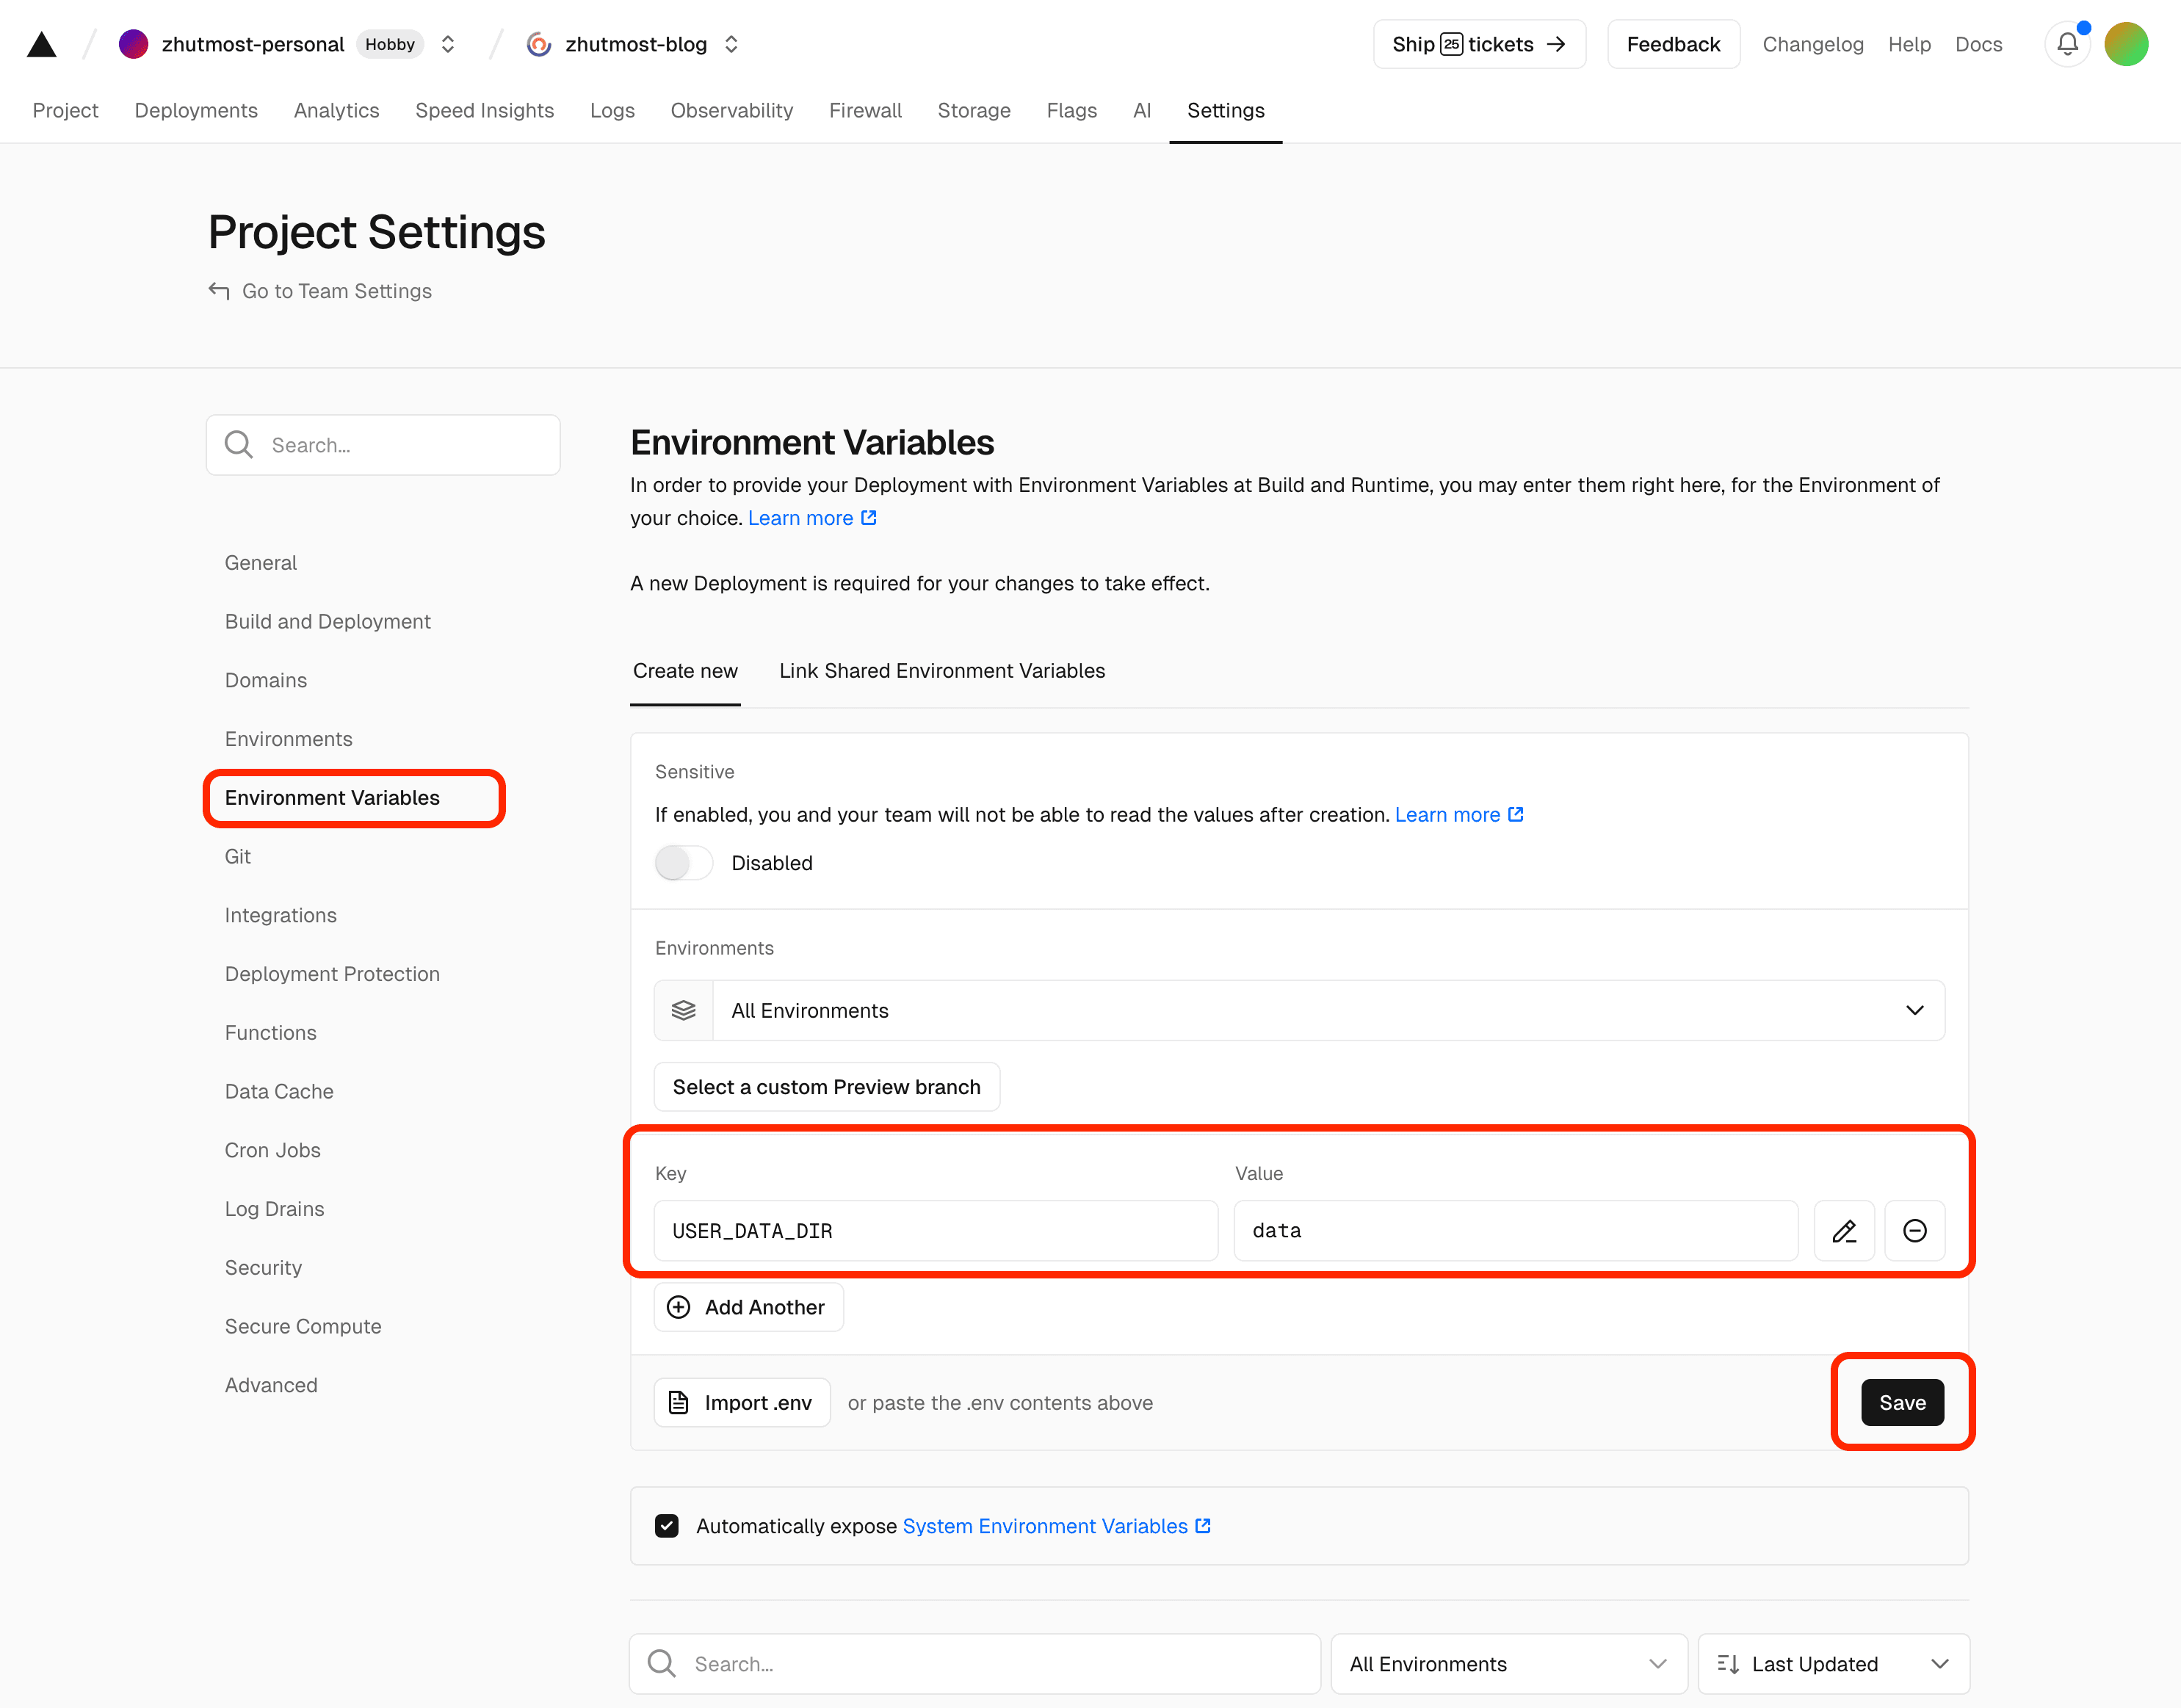
Save the variable and redeploy the project. SITE_DIR is read during the build, so changing it always requires a new deployment.
Update the basic site information
Open:
sites/my-site/site.config.tsAt minimum, replace the URL, title, description, and author:
import { type InputSiteConfig } from "@/lib/config"

const config: InputSiteConfig = {
  siteUrl: "https://example.com",
  siteTitle: "Example Site",
  description: "A short description of the site.",
  author: "Your Name",
}

export default config
After Vercel assigns the final domain, use that origin for siteUrl. It is used when generating canonical URLs, social metadata, and the RSS feed.
Navigation, favicons, post ordering, comments, and other site-wide options are covered in Site Configuration.
Write your first post
Create an MDX file under the active site's _posts directory:
sites/my-site/_posts/hello-world.mdxA minimal post contains a title, summary, publication date, and category:
---
title: Hello, World
summary: My first post with Analog Starter.
datePublish: 2026-08-21
category: Notes
---

This is my first post.

## A section

Posts use ordinary Markdown syntax and may also include MDX components.
The post is available at:
/post/hello-worldSee Content Model for authors, tags, covers, drafts, pages, profiles, and other content types.
Optional project checks
Before pushing a larger change, you can run the configured lint and formatting checks:
bun run checkAuto-fixable issues can be handled with:
bun run check:writeThese checks are mainly useful when source code or configuration files have been edited.
Documentation
The remaining guides cover each part of the starter in more detail:
- Site Configuration — site identity, navigation, content defaults, comments, and social metadata;
- Content Model — posts, pages, authors, homepage sections, news, and people;
- Customization — colors, fonts, rounded corners, and the overall visual style;
- Integrations — Giscus comments, Umami analytics, RSS, and other external services;
- Tech Stack — the main frameworks and the reasons behind the current architecture.
The articles under _posts/test provide rendered examples of Markdown syntax, images, tables of contents, and large tag collections.